Quantum Development Environments
A working quantum dev environment needs Python 3.9+ with isolated virtual environments to prevent dependency conflicts
Source: mortalapps.com- A professional quantum development setup requires Python 3.9+ and an isolated virtual environment.
- Virtual environments prevent dependency conflicts between Qiskit and other Python libraries.
- The core packages for modern quantum development are
qiskit,qiskit-aer, andqiskit-ibm-runtime. - JupyterLab is the preferred interactive development environment (IDE) for quantum prototyping and visualization.
- Your IBM Quantum API token acts as your digital credential to access real quantum hardware over the cloud.
- Using
QiskitRuntimeService.save_account()stores your credentials securely, keeping your code clean and secure.
Why This Matters
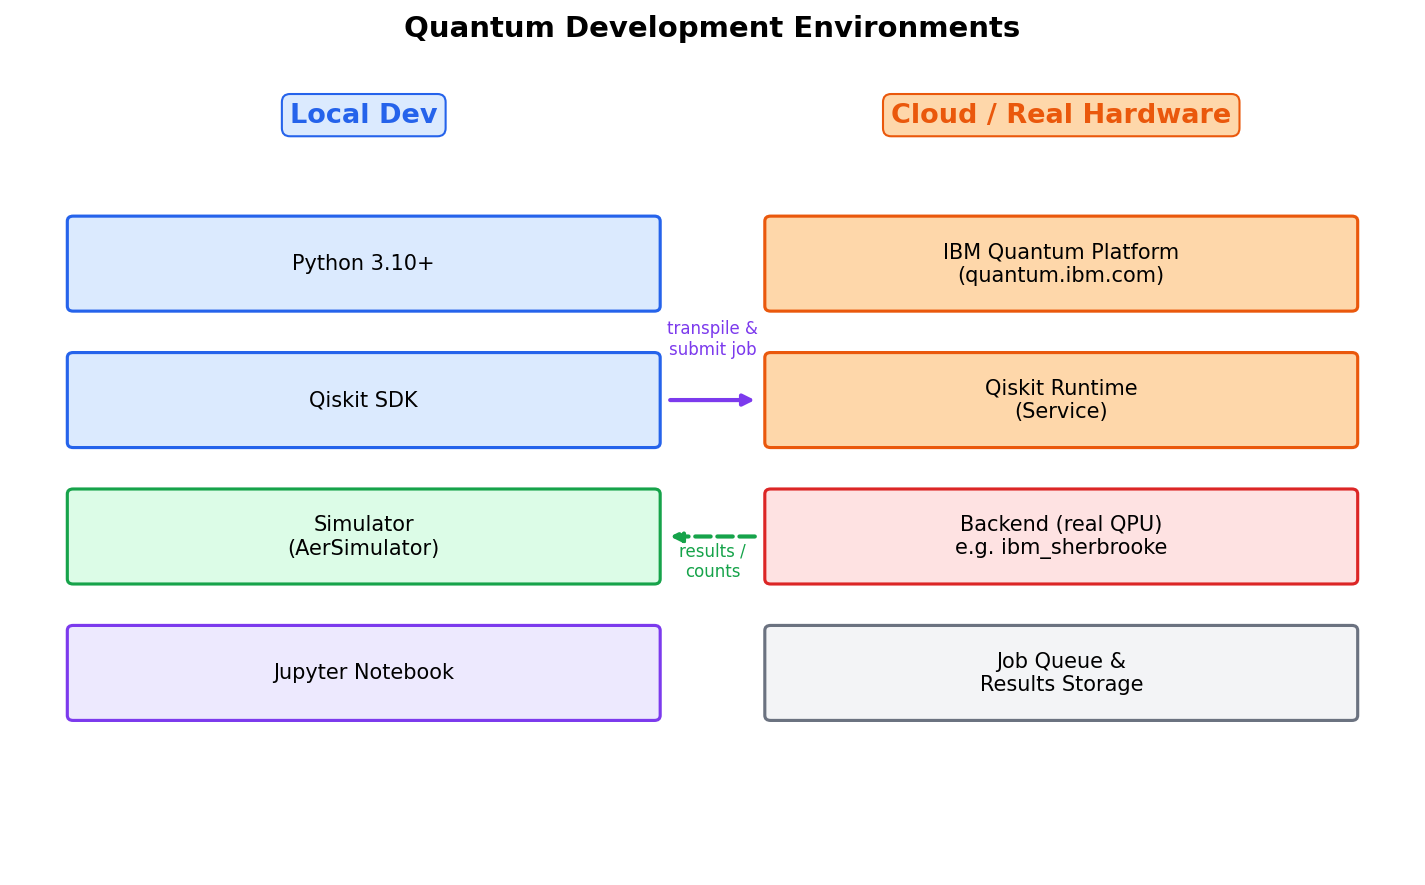
To write and execute quantum programs, you need a properly configured development environment. Quantum programming relies on a hybrid software stack: you write classical code (typically in Python) that interacts with quantum libraries, which in turn compile and send instructions to local simulators or remote quantum hardware. Setting up this environment correctly is essential to avoid dependency conflicts and ensure smooth execution of your code.
There are two primary ways to develop quantum programs: locally on your own computer, or in the cloud using hosted environments. Local development gives you full control over your files, IDEs, and local simulation resources, while cloud environments provide pre-configured workspaces and direct integration with quantum hardware providers. For professional development, a local setup using virtual environments is highly recommended.
In this topic, you will learn how to set up a robust, modern quantum development environment. We will cover installing Python, managing virtual environments, installing Qiskit 1.x and its associated packages, and configuring your API credentials to access real quantum hardware over the cloud. By the end of this topic, your machine will be fully equipped to run any quantum program.
Core Intuition
Think of setting up your quantum development environment like setting up a physical woodworking workshop. Before you can build furniture, you need a dedicated space (a virtual environment) so your tools don't get mixed up with other household items. You need to install your workbench (Python and Jupyter Notebooks), gather your specialized tools (the Qiskit SDK), and set up a secure communication line to the lumber yard (the IBM Quantum cloud API) so you can order materials when needed.
If you don't use a virtual environment, it's like throwing all your tools, gardening, automotive, and woodworking, into a single pile. Eventually, a wrench will dent a chisel, meaning a library update for a web development project might break your quantum simulation libraries. Virtual environments keep your quantum tools isolated and pristine.
Configuring your API token is like setting up a secure badge reader at the entrance of a high-tech laboratory. The physical quantum computers are located in secure facilities owned by IBM and other providers. Your API token is your digital badge that authenticates who you are, checks your access permissions, and lets you submit jobs to the queue from anywhere in the world.
Visualization
Technical Explanation
A professional Qiskit development environment requires Python (version 3.9 to 3.12 is recommended for Qiskit 1.x). We use a virtual environment manager like venv or conda to isolate our dependencies. The core package is qiskit, but for high-performance local simulation, we also install qiskit-aer. To connect to real hardware, we install qiskit-ibm-runtime.
Here is the step-by-step terminal workflow to set up your environment from scratch:
# Step 1: Create a directory for your quantum projects and navigate into it
mkdir quantum_projects
cd quantum_projects

# Step 2: Create a virtual environment named 'qiskit-env'
python3 -m venv qiskit-env

# Step 3: Activate the virtual environment
# On macOS/Linux:
source qiskit-env/bin/activate
# On Windows (Command Prompt):
# qiskit-env\Scripts\activate.bat
# On Windows (PowerShell):
# qiskit-env\Scripts\Activate.ps1

# Step 4: Upgrade pip to the latest version
pip install --upgrade pip

# Step 5: Install Qiskit, the Aer simulator, and the IBM Runtime service
pip install qiskit qiskit-aer qiskit-ibm-runtime jupyterlab
Once the installation is complete, you can verify your installation and save your IBM Quantum API token (which you can get by creating a free account at quantum.ibm.com) using the following Python script:
# verify_setup.py
import qiskit
import qiskit_aer
import qiskit_ibm_runtime
from qiskit_ibm_runtime import QiskitRuntimeService

print("Qiskit version:", qiskit.__version__)
print("Qiskit Aer version:", qiskit_aer.__version__)
print("Qiskit IBM Runtime version:", qiskit_ibm_runtime.__version__)

# Save your IBM Quantum credentials locally (run this once)
# Replace 'MY_API_TOKEN' with your actual token from quantum.ibm.com
# QiskitRuntimeService.save_account(channel="ibm_quantum", token="MY_API_TOKEN", overwrite=True)

print("Setup verified successfully!")
Saving your account writes your API token to a secure local configuration file. In future scripts, you can instantiate the service simply by calling service = QiskitRuntimeService(), without hardcoding your sensitive API token in your code files.
Key Takeaways
qiskit, qiskit-aer, and qiskit-ibm-runtime.QiskitRuntimeService.save_account() stores your credentials securely, keeping your code clean and secure.